
You might be tired of the feed. Or maybe you just want your data gone. Privacy concerns, time management, or simply switching to other platforms often drive people to the same conclusion: it’s time to cut ties.
Deleting your Facebook account is a big deal. It is not the same as deactivating it. Deactivation hides your profile temporarily. Deletion removes it, mostly for good. You need to be sure before you click that button.
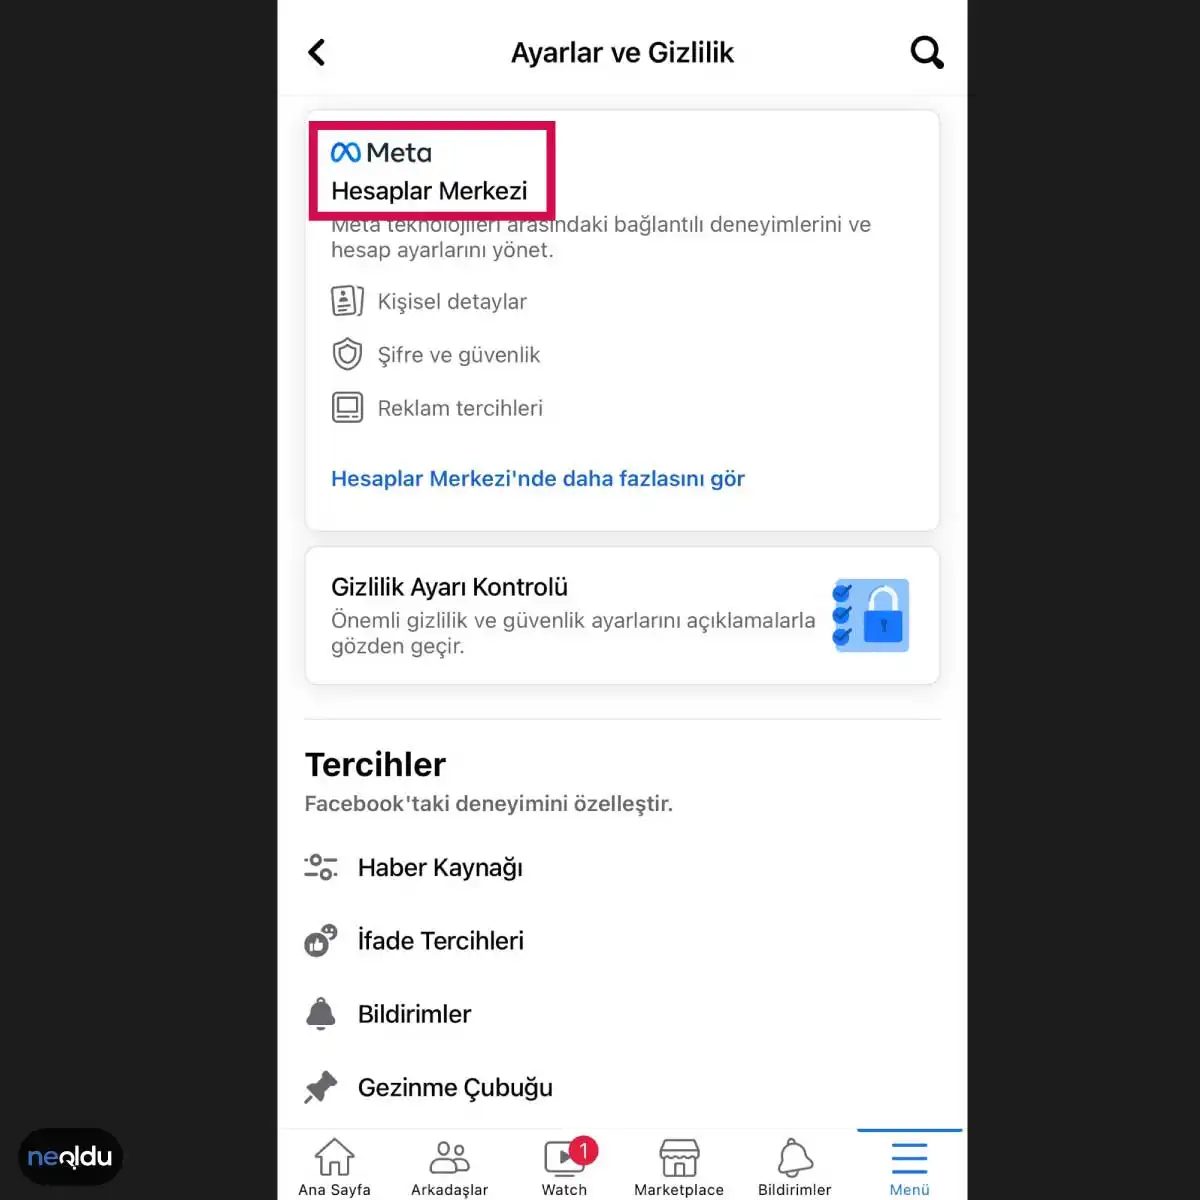
The path to deletion has changed with Meta’s recent updates. You no longer dig through old settings menus. The process now lives inside Meta Account Center.
Here is where the process leads:
Menu / Account Center / Personal Details / Account Ownership and Control / Deactivate or Delete.
Let’s walk through the first step on mobile.
Accessing the deletion tool on mobile
Open the Facebook app on your phone. Log in if you haven’t already. Tap the Menu icon, usually located in the bottom right corner (iOS) or top right (Android).
Look for the section labeled Account Center near the top. Tap it. This is the central hub for your Meta profiles now.
Note: If you cannot find “Account Center,” check your app version. Meta has been rolling out this interface globally, but older versions may still show the legacy “Settings & Privacy” path.
Navigating the account security hub
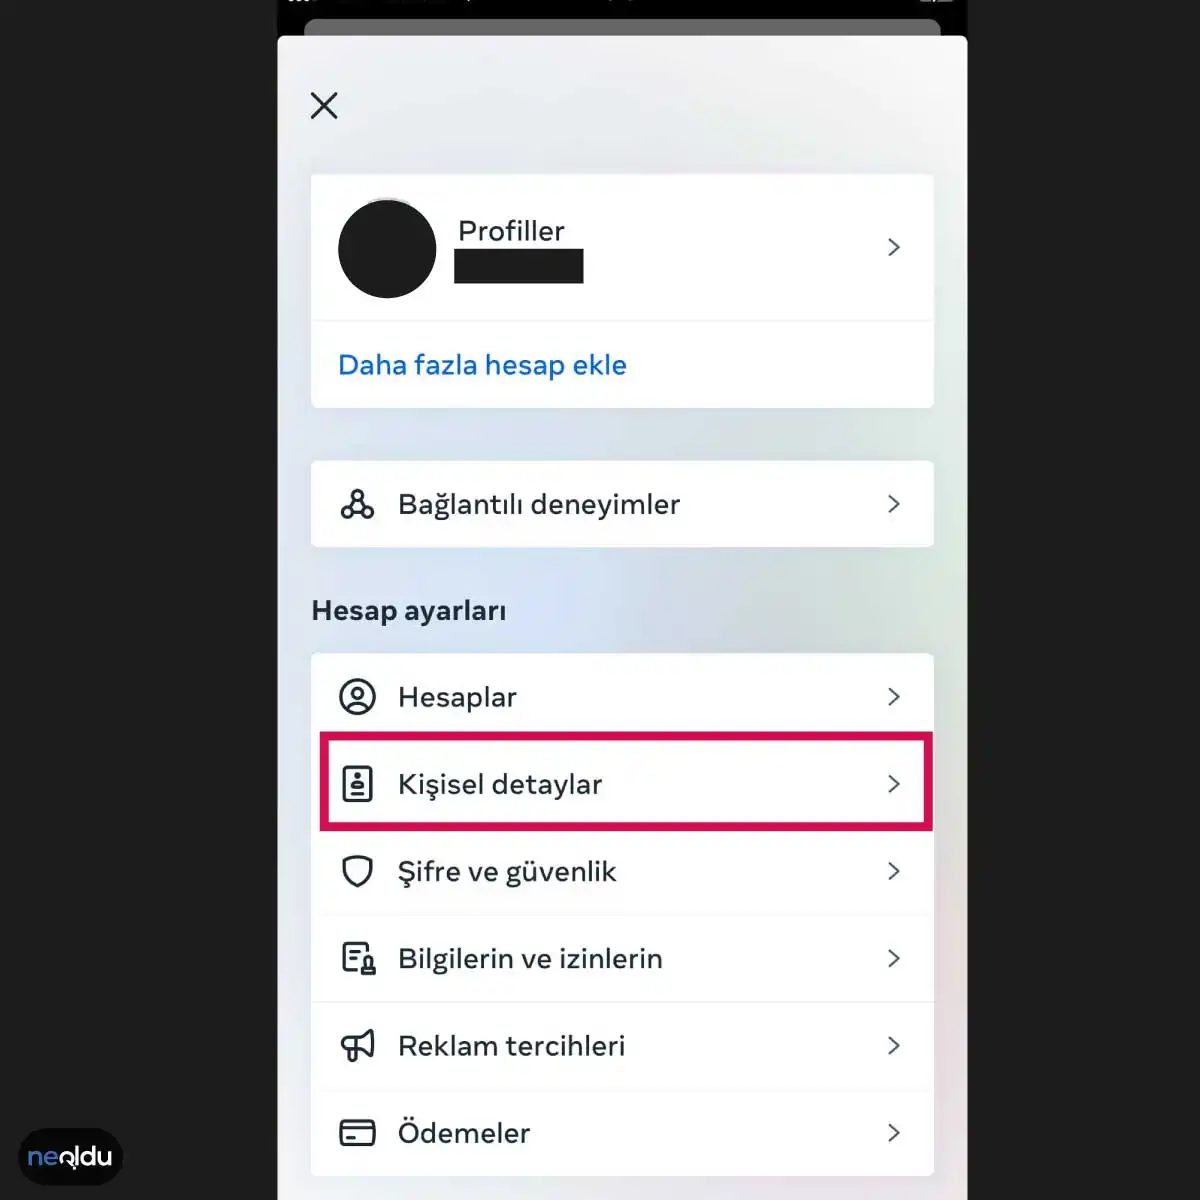
You’re in the settings menu now. Look for the section labeled Personal details. That’s your first stop. It holds the basic info about you, but don’t stop there if you want to tighten up your security posture.
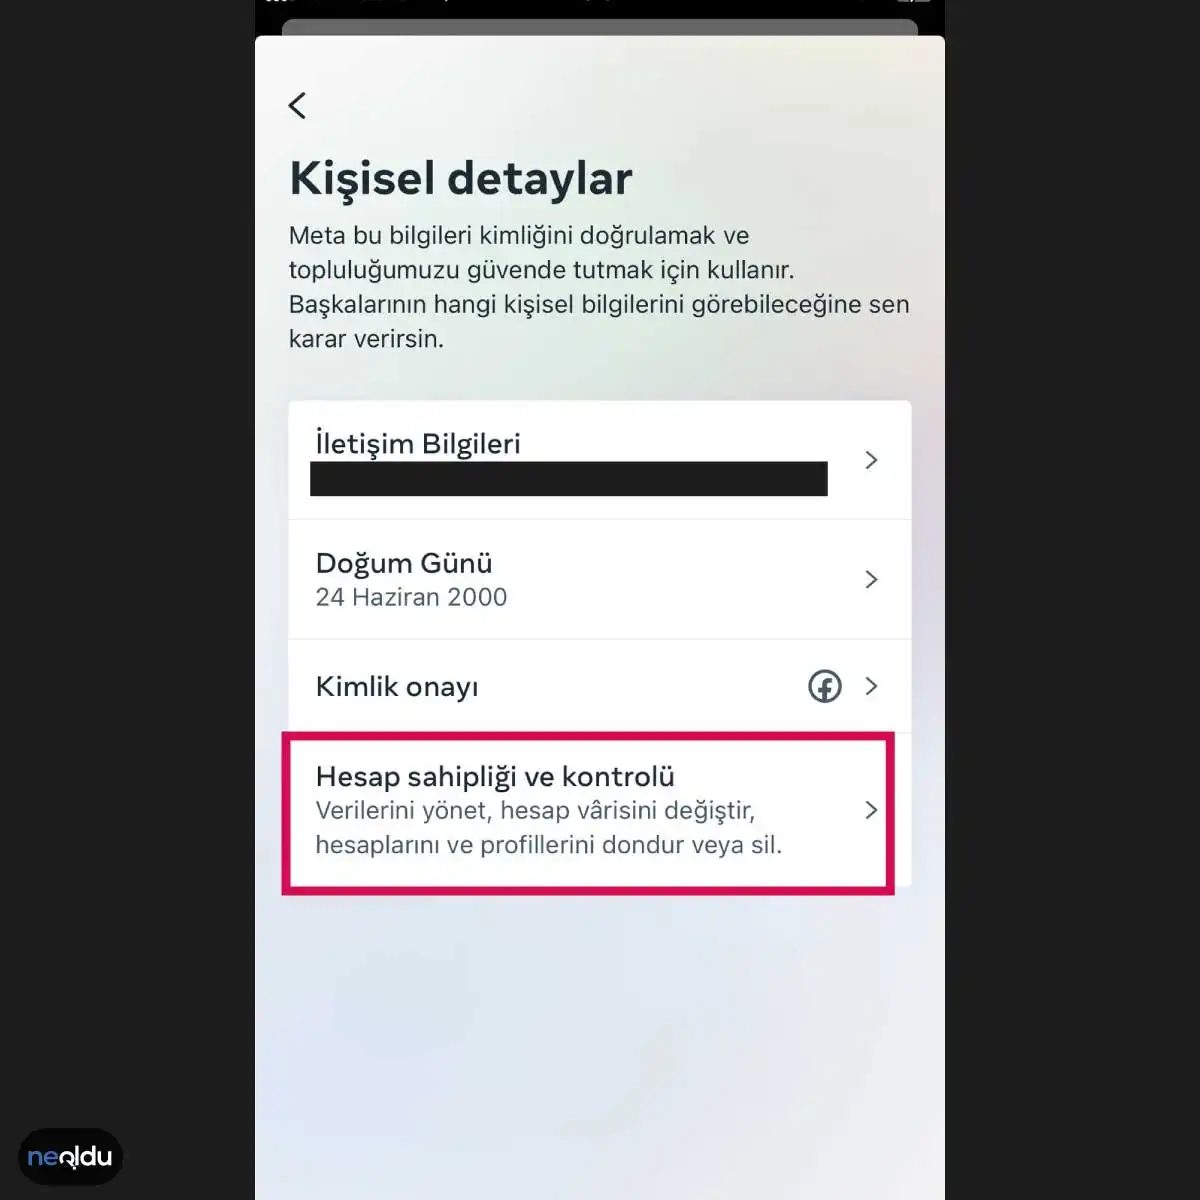
Scroll down. Right below your contact information, you’ll see a button or link called Account ownership and control. Click it. This is where the real levers for your digital identity live. It’s less about your profile and more about who actually holds the keys to the door.
Why you should be here
Why bother digging into this specific corner of your profile? Because this is where you manage the fundamental access rights to your account. It’s not just about changing a password. It’s about verifying who is authorized to take over if something goes wrong.
Most users ignore this tab until it’s too late. They assume their primary login credentials are enough. They aren’t. If you lose access to your email, or if your device gets stolen, this is the safety net. Or the tripwire. Depending on how it’s set up.
This section typically lets you:
- Verify your identity through secondary methods.
- Designate emergency contacts.
- Review active sessions and devices.
- Adjust ownership transfer permissions.
It feels bureaucratic. It is. But it’s the difference between recovering your account in twenty minutes and filing a support ticket that sits in a queue for two weeks. The interface might be clunky, and the language can be dry, but the functionality is solid. You’re essentially creating a backup chain of command for your online self.
Don’t just click through it because the UI is boring. Read the options. Check which methods are active. If you haven’t verified your account ownership recently, do it now. It takes less time than you think, and it saves a headache later.
How to permanently delete your Facebook account from a computer
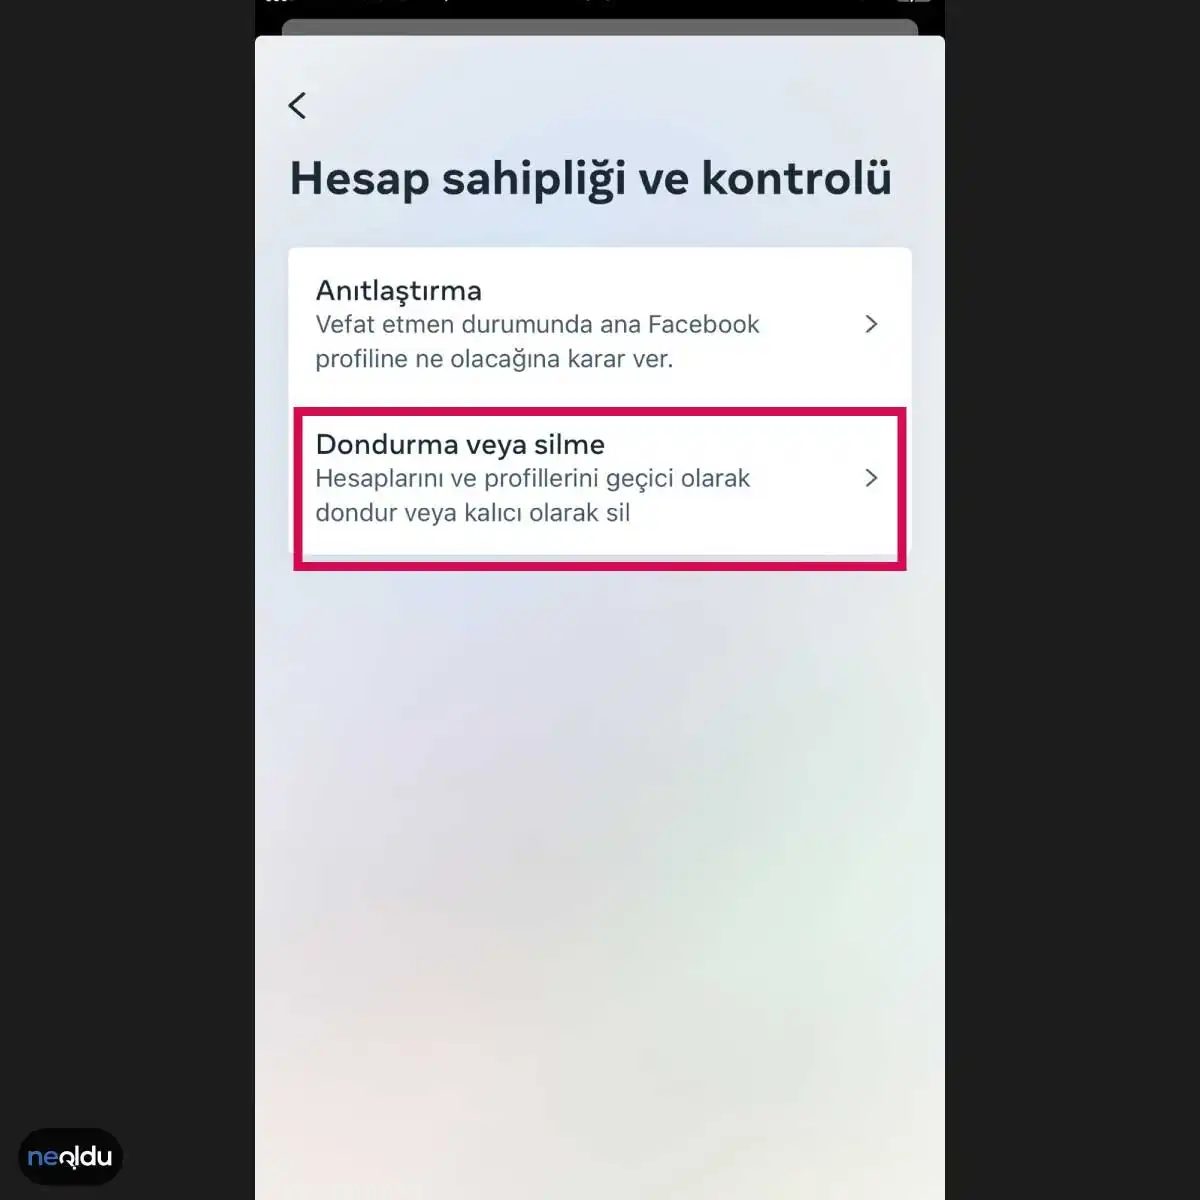
You are on the last step. The process is called “Deactivation or deletion.” This is where you actually remove the account. Forever.
Navigate to Settings & Privacy. Click Settings. Look for “Accounts Center.” Under “Personal details,” find “Account ownership and control.”
Select “Deactivation or deletion.” Choose “Delete account.”
Facebook asks for a reason. You can ignore that or pick one. Then it asks for your password. Type it in.
There is a confirmation screen. It explains what happens next. Your posts, photos, and videos are gone. Your friends cannot find your profile. Search engines stop indexing your page.
“Once you delete your account, this cannot be undone.”
This is not a pause. This is the end.
What happens after you delete your Facebook account?
The data does not vanish instantly. Facebook retains some data for a while. Backups run. Logs stay. But your profile is offline. No one can see it.
You can undo this for a short period. How long? Up to 30 days. If you log in within that window, the account comes back. All your posts, friends, and settings reappear.
After 30 days, the data is purged. You cannot bring it back. No support ticket fixes this. No admin call works.
Why do people delete their Facebook accounts?
Privacy concerns. Data breaches. You are tired of the algorithm. You want a clean slate. Or you are moving to another platform.
Deletion is different from deactivation. Deactivation hides your account. It stays in the system. You can return anytime. Deletion removes it.
If you are unsure, deactivate first. Test the waters. If you miss it, log back in. If you do not, delete it for good.
Which data can you export before deleting?
Go to Settings & Privacy. Then “Your information and permissions.” Choose “Download your information.”
This gives you a zip file. It contains your posts, photos, messages, and account details. Save it. Facebook deletes the account, but you keep the archive.
Do not skip this. Once the 30-day window closes, you have nothing.
Where else can I delete my Facebook-linked data?
Third-party apps. If you used Facebook login to access other sites, they still have your email. You may need to go to those sites separately to remove the link.
Your Messenger account is tied to Facebook. Deleting Facebook deletes Messenger too. There is no separate option.
If you have a Page, delete that separately. Pages do not disappear automatically when your personal account goes.
Is there a difference between deleting a personal account and a Page?
Yes. A Page is a brand or organization. It can exist without a personal profile if it has multiple admins. A personal account is tied to one identity. Delete the personal account, and the Page needs another admin to stay live.
If you are the only admin, delete the Page first. Then delete the personal account.
Can I recover my Facebook account after 30 days?
No. The data is gone. Facebook has stated this clearly. There is no workaround.
If you accidentally deleted it and are within the window, log in. The account restores. If

How to back up your Facebook account before permanent deletion
You want out. Maybe the noise got too loud, or you just realized you haven’t logged in since 2019. Before you pull the trigger on that delete button, look at what is actually stored in that digital graveyard. Your friend list, old statuses, photos from vacations you barely remember. It is all there.
Back it up. Seriously.
Go to Settings & Privacy, then Account Center, then Personal Details, and finally Download your information. This creates a package of your data. You can download it via email or cloud storage. If you skip this step, you are throwing away a digital snapshot of your life. There is no undo button for forgotten memories once the server wipes them.
Which link actually deletes your Facebook profile permanently
Once your backup is safe, you need the direct route. Go to the Delete Account link. It is not hidden in a menu anymore; Facebook wants to make sure you are sure. The link takes you to a confirmation page.
Click to proceed.
Facebook will ask you to confirm. After you confirm, your account enters a 30-day countdown. This is not a trial period. It is a grace period.
Here is the catch: if you log in during those 30 days, the deletion stops. The account stays active. No log-in for 30 days? The data is gone. Permanently. Your email, phone number, and profile name become available to anyone else.
Why Facebook keeps your account inactive for 30 days before erasure
You might wonder why they don’t just delete it instantly. Risk management. People click “delete” in moments of anger, boredom, or confusion. The 30-day window is a safety net. It gives you time to realize you made a mistake.
But do not count on it. If you are truly done, set a reminder for day 31. Do not log in. If you log in, even to check if the account is still there, you restart the clock.
Where your Facebook data goes after the deletion window closes
After 30 days, the data is purged. Not just hidden. Deleted. Your photos are removed from servers. Your friend connections are severed. Your timeline is erased from the public view.
There is no archive. No backup in a hidden folder. Facebook does not keep a “just in case” copy that you can access later. If you did not download your data before the 30 days, it is gone.
How to cancel a Facebook account deletion before the 30 days expire
Simple. Log in.
If you are within the 30-day window, logging in cancels the deletion request. Your account returns to its previous state. Your friends will not see a notification. Your photos will reappear. The timeline will rebuild.
But again, this only works if you act before the clock hits zero.
What happens to your Facebook Messenger account when you delete your profile
This is the part that catches people off guard. Deleting your Facebook account also deletes your Messenger data. Your chat history goes with it. Your profile picture disappears. Your contacts who have your number can still message you if you keep your phone number linked, but the account identity is gone.
If you want to keep messaging friends

What actually happens to your data after you delete your Facebook account
Once you confirm the deletion, the process isn’t instantaneous in a way that gives you a second chance. Facebook wipes the specific data tied to that profile. If you didn’t grab a copy beforehand, that data is gone. Permanently. There is no “undo” button for deleted account files. The platform automatically removes your content as part of the termination protocol.
You might be wondering why you can’t just restore it later. The answer is simple: the architecture isn’t built for recovery after the fact. If you missed the backup window, you’re stuck. The only way to retain your photos, posts, and messages is to have them stored outside of Facebook before the axe falls.
How to back up your Facebook data before you delete your account
You still have time if you haven’t hit the final confirmation. The path to your data is buried in the settings menu, but it is there. Navigate to Settings & Privacy, then Account Information, followed by General. Look for Download your information.
This generates a zip file containing your posts, profile, and friends list. You can have Facebook email this link to you or send it to a cloud storage service. Download it. Save it locally. Don’t just leave it in your inbox.
Once you delete the account, you cannot restore the data. The backup is your only lifeline.
This isn’t about being paranoid. It’s about controlling your digital footprint. If you decide to leave Facebook, you should own the data that leaves with you. Otherwise, it just evaporates into the server void.
Why you can’t recover Facebook account data after deletion
Users often assume deleted accounts sit in a limbo state, waiting to be resurrected. That isn’t how it works. When you delete an account, Facebook triggers a cleanup routine that removes the associated records. There is no hidden archive where your old photos are waiting quietly. The system treats the deletion as a final command.
This makes the pre-deletion backup the critical step. Without it, the data is lost. With it, you keep the artifacts even if the platform no longer hosts them. It’s the difference between deleting a file from a local drive (which might be recoverable) and wiping a server partition (which usually isn’t).
What to do if you already deleted your account
If you’ve already crossed that line, your options are slim. You cannot log back in to restore deleted files. You cannot request a recovery from support that will bring back purged data. The only thing you can do now is check if you accidentally saved a backup in your email or cloud drive. If that file exists, you can extract the photos and texts manually. If it doesn’t, the data is effectively gone.
This is a harsh reality of most social platforms. They prioritize privacy and storage efficiency over user data retention once a user requests termination. You have to act before the request is processed.

Facebook hesabını silme sonrası neler kaybolur?
Eylem geri alınamaz. Tıkladığınız an, süreç başlar ve geri dönüş kapısı kapanır. Facebook hesabınız silindiğinde, orada biriken her şey gider. Paylaştığınız fotoğraflar, videolar, mesajlar ve kişisel bilgiler sunuculardan çekilir. Artık arama motorlarında veya Facebook içi aramalarda profilinize dair herhangi bir iz kalmaz.
“Hesabınızın silinmesi, hesapla ilişkili tüm verilerin kalıcı olarak kaybolmasına neden olur.”
Bu durum, üçüncü taraf uygulamalar için de aynıdır. Facebook’a bağlı olan o uygulamalar, hesap ortadan kalktığı için erişim haklarını kaybeder. Verileriniz o platformlarda da erişilemez hale gelir.
Silme işleminden önce veri yedeklemesi neden önemli?
Verileriniz gitti mi gitti. Kaldıysa da kurtarması zor. Bu yüzden, silme düğmesine basmadan önce hesabınızdaki verileri dışarıya aktarmanız en mantıklı adım. Fotoğraflarınızı, videolarınızı ve önemli mesajlarınızı bilgisayarınıza indirin. Hesabı kapatmak, dijital ayak izinizin bir kısmını yok etmek demektir ve bu işlem kalıcıdır.
Facebook sunucularında veriler neden bir süre daha kalabilir?
“Hesabım silindi, verilerim anında buharlaştı” diye düşünebilirsiniz. Gerçeklik biraz daha karmaşık. Facebook, silme işlemini tamamlamak için bir süre verilerinizi sunucularda tutar. Bu, teknik bir zorunluluktur. Sistem, silme talebinin gerçekten işlendiğinden emin olmak için bir tampon süresi kullanır. Bu süreç bittiğinde, veriler asıl olarak silinir.
Minimum yaş sınırı nedir?
Facebook hesabı açmak için belirli bir yaş şartı vardır. Silme işlemi bu sınırdan bağımsızdır; hesabınız varsa, silme hakkınız da vardır. Ancak hesabı baştan oluşturmak için platformun belirlediği minimum yaş koşulunu karşılamanız gerekir. Bu, hesap yönetimi değil, hesap oluşturma aşamasında bir kısıtlamadır.

18 yaş sınırı, silme işlemi için bir kalkan görevi görüyor. Platform, bu eylemin geri dönüşü olmayan sonuçları olduğunu varsayıyor. Küçük yaştaki birinin tıklama yapmasıyla tüm dijital geçmişinin yok olmasını istemiyorlar.
Bu yüzden 18 yaş altı kullanıcılar için süreç farklı işliyor. Ebeveyn ya da yasal vasi devreye girmeli. Onların hesabı yönetmesi ve silme prosedürlerini takip etmesi gerekiyor. Facebook’un belirlediği adımlar, bu yetişkin denetimi olmadan tamamlanamaz.
Yaş sınırı sadece bir formalite değil. Kullanıcının işlemi bilerek yapma kapasitesini ölçen bir gösterge. Hesabınızı silmeden önce gerçekten ne yaptığınızı anlamalıyız.
Facebook hesabını geçici olarak devre dışı bırakma
Kalıcı silme korkutucu gelebilir. Belki de sadece bir mola ihtiyacınız var. Facebook hesabınızı geçici olarak devre dışı bırakmak, bu boşluğu doldurur.
Hesabınız devre dışıyken profiliniz, fotoğraflarınız ve paylaşımlarınız görünmez hale gelir. Ancak verileriniz silinmez. Tekrar giriş yaptığınızda her şey yerli yerinde olur.
Bu özellik, 13 yaş üstü tüm kullanıcılara açıktır. Silme işleminden farklı olarak, ebeveyn onayı şartı yoktur. Kendi başınıza yapabilirsiniz.
Ayarlar menüsünden “Hesap Durdurma” seçeneğine gidersiniz. Nedeninizi seçersiniz, süre belirlersiniz. Sadece “geçici olarak” ibaresini okuyun. Geri dönebilirsiniz.
Bu seçenek, dijital yorgunluk yaşayanlar için pratik bir kaçış. Hesabınızın tamamen kaybolma riski yok. Sadece dinleniyor.
Yaş sınırları neden bu kadar katı?
ABD’de 13, AB’de 16, silme için 18. Rakamlar karmaşık görünüyor ama mantık basit. Yasal düzenlemeler yerel olarak farklı.
COPPA gibi yasalar, çocukların kişisel verilerinin korunmasını zorunlu kılıyor. Silme işlemi ise hukuki bir eylem. 18 yaş altına, kendi dijital varlığını yok etme yetkisi verilmez.
Bu sınır, kullanıcıyı korumak için. Bir gencin öfke anında hesabını silip yıllar sonra pişman olmasını istemiyorlar. Ebeveyn denetimi, bu duygusal kararların önüne geçiyor.
Hesap silme ve devre dışı bırakma farkı nedir?
Birini karıştırmayın.
- Silme: Kalıcı. 30 gün içinde geri alabilirsiniz ama sonra yok.
- Devre dışı bırakma: Geçici. İstediğiniz zaman geri dönebilirsiniz.
Silme işlemi, verilerin sunuculardan kaldırılmasını başlatır. Devre dışı bırakma, verileri dondurur

Facebook hesabını geçici olarak devre dışı bırakma nasıl çalışır?
Bu özellik, dijital bir mola verir. Hesabınızı tamamen silmek zorunda kalmadan, bir süreliğine ortadan kalkarsınız. Ancak “kapanış” kelimesi yanıltıcıdır. Arkadaş listesi, mesaj geçmişi ve paylaşımlarınız yerli yerinde durur. Sadece görünmez olursunuz.
Erişim süreci basit ama kritik bir detay içerir: 30 gün. Bu süre dolduğunda sistem otomatik olarak hesabınızı yeniden etkinleştirir. Devre dışı bırakma işlemini tekrarlamazsanız, hesabınız kendiliğinden uyanır. Bu yüzden uzun vadeli bir aradan önce bu zaman sınırlamasını göz önünde bulundurmanız gerekir.
Hesabı devre dışı bırakmak için hangi adımlar izlenmeli?
İşlem şu şekilde ilerler:
- Facebook hesabınıza giriş yapın.
- Sağ üst köşedeki ok simgesine tıklayın ve açılan menüden “Ayarlar” seçeneğine gidin.
- “Genel” bölümüne ulaşın.
- “Hesap Yönetimi” altında yer alan “Hesabını Devre Dışı Bırak” seçeneğine dokunun.
- Karşınıza çıkan ekranda devre dışı bırakma seçeneğini onaylayın.
Bu noktada 30 günlük geri sayım başlar.
Hesap kapalıyken neler olur ve neler olmaz?
Devre dışı bırakma anında iki şey olur:
– Hiç kimse profilinize erişemez.
– Siz de giriş yapamazsınız.
Ancak tuhaftır, Facebook Messenger kullanımı devam eder. Arkadaşlarınızla sohbet edebilir, mesaj gönderebilirsiniz. Yani sosyal varlığınız tamamen kesilmez, sadece profil sayfanız kilitlenir.
Hesabı tekrar açmak için ekstra bir işlem yoktur. 30 gün dolmadan mı dönüyorsunuz? O zaman sadece kullanıcı adınız ve şifrenizle giriş yapın. Sistem hesabınızı anında geri yüklemez; zaten silinmemişti. Sadece erişim yetkiniz geri açılır.
“Hesabı tamamen silmek istemiyorum ama şimdilik uzak kalmak istiyorum.”
Bu cümle, bu özelliğin asıl varlık sebebini özetler. Tatil, yoğun iş dönemi veya sadece dijital toksisite kaçışları için idealdir. Veri kaybı riski yok. Geri dönüş garantili.
Facebook hesabı silindikten sonra tekrar açılabiliyor mu?
Bu soru, geçici devre dışı bırakma ile kalıcı silme arasındaki farka işaret eder. Devre dışı bırakma, geri dönüşümlüdür. Kalıcı silme ise farklı bir süreçtir ve çoğu zaman geri alınamaz.
Eğer hesabınızı 30 gün boyunca devre dışı bırakıp tekrar giriş yapmazsanız, Facebook hesabınızı otomatik olarak siler mi? Hayır.

Android ve iOS’te Facebook Hesabını Silme
Telefonunuzdan işlem yapmak istiyorsanız, yol biraz farklı. Android ve iOS kullanıcıları için süreç neredeyse aynı, sadece arayüzde küçük farklar var. Her iki platformda da mobil tarayıcı üzerinden veya doğrudan uygulama içinde gidilecek menüler değişiyor.
Öncelikle Facebook uygulamasını açın. Profil simgesine dokunarak ayarlara gidin. Burada “Hesap ve Güvenlik” veya “Kişisel Bilgiler” bölümüne ulaşmanız gerekiyor. Yeni arayüzlerde bu yol “Hesap Ayarları” altında gizlenmiş durumda. Sonrasında “Hesabı Yönet” kısmına girip “Silme” seçeneğini arayın.
Birçok kişi bu adımı atlayıp uygulamayı silmeyi deniyor. Bu işe yaramaz. Uygulamayı telefonunuzdan kaldırmak hesabınızı kapatmaz, sadece yerden tasarruf etmenizi sağlar. Gerçek silme işlemi, web arayüzü veya uygulama içindeki kalıcı silme komutuyla yapılır.
İşlemi başlattığınızda Facebook size bir onay mesajı atar. Bu mesaj, verilerinizin geri alınamayacağını net bir şekilde belirtir. “Vazgeç” seçeneği her zaman görünür. Birkaç gün içinde bu seçeneğe tıklarsanız, hesabınız aktif hale gelir. Tıklamazsanız, süre dolduğunda son adım gerçekleşir.
Yedekleme konusunda geri dönüp tekrar bakalım. Hesabı silmeden önce “Tüm Verilerinizi İndir” seçeneğini kullanmak akıllıca. Bu dosya, fotoğraf, mesaj, yorum ve arkadaşlık geçmişinizin bir arşivi olur. Silme işlemi tamamlandıktan sonra bu dosya, dijital mezarınızın tek kanıtıdır.
“Hesabınızı sildiğinizde, arkadaşlarınız profilinizi göremez, ancak daha önce onlara gönderdiğiniz mesajlar sohbet geçmişlerinde kalabilir.”
Bu, çoğu kullanıcının kaçırdığı bir detay. Siz hesabınızı silesiniz, eski arkadaşınızın telefonunda sizinle ilgili chat geçmişi orada durur. Bu durum, tam bir mahremiyet temizliği olarak kabul edilemez. Mesajlar, Facebook sunucularından silinir ama karşı tarafın yerel kopyası kalabilir.
Android ve iOS arasındaki asıl fark, bildirimlerin nasıl işlendiğidir. iOS’te, silme talebi sonrası gelen doğrulama bağlantısı bazen e-posta filtresinde kaybolabiliyor. Android tarafında ise tarayıcı yönlendirmeleri daha tutarlı çalışıyor. Hangi cihazı kullanırsanız kullanın, işlem bittikten sonra oturumunuzun kapandığından emin olun.
Bu kadar veri kaybını göze almadan önce, neden bu kadar acele ettiğinizi kendinize sorun. Belki sadece geçici bir mola istiyordunuz. Facebook, “Hesabı Dondur” seçeneğini sunuyor. Bu, tam silmeden farklı; hesabınız gizlenir ama verileriniz korunur. Geri dönüş isterseniz, tek

Facebook hesap silme işlemini telefonla nasıl yaparsınız?
En yaygın hata, bu sürecin uygulama içinde tamamlanabileceğini düşünmektir. Hayır. Facebook uygulaması, kalıcı silme işlemini desteklemez. Bu büyük bir yanılgı ve çoğu kişi hâlâ mobilde yer alan Facebook uygulamasından hesap kapatma yapabileceğini sanıyor.
Yapamazsınız.
Mobil cihazlarda Facebook hesap silme mobil ortamında ancak bir web tarayıcısı aracılığıyla gerçekleştirilebilir. iOS kullananlar için Safari, Android kullananlar için Google Chrome standart seçeneklerdir. Bu tarayıcılar zaten cihazınızda mevcuttur; yoksa uygulama mağazasından indirebilirsiniz.
Neden tarayıcı zorunlu?
Mantık basit. Masaüstünde hesap kapatırken tarayıcı kullandığınız gibi, telefon da aslında mini bir bilgisayardır. Tarayıcı açtığınızda, Facebook’un “kalıcı olarak facebook hesap silme” sayfasına doğrudan yönlendirilirsiniz.
Buradaki adımlar, masaüstünde anlattığımız süreçle birebir aynıdır. Çünkü altyapı aynıdır: tarayıcı üzerinden erişim.
Facebook hesap silme işlemi için her daim bir tarayıcı gerekmektedir.
Başka bir deyişle, mobil cihazınızla bilgisayar gibi davranıyorsunuz. Uygulama değil, web arayüzü işinizi görür.
Facebook hesap silme kaç gün sürer?
Başlık bunu soruyor ama metin burada kesiliyor. Süre, silme talebinin ardından 30 gün bekleme dönemini içerir. Bu süre içinde hesabınıza yeniden giriş yaparsanız, silme işlemi iptal edilir. Giriş yapmazsanız, 30 günün sonunda hesap kalıcı olarak kapatılır ve verileriniz silinir.

The 14-day cooling-off period: why your account doesn’t vanish immediately
You clicked the link. You followed the prompts. The confirmation screen said it was done. And yet, if you try to log in tomorrow, your Facebook account will still be there. That is not a bug. It is a 14-day grace period designed to stop you from changing your mind in a moment of rage.
If you access your profile within those two weeks, the permanent deletion request is cancelled. The account stays active. Your friends can still see your posts. Your photos remain in albums. The system treats that login as a signal that you were not serious, or at least not serious enough to lose your data forever.
What happens when the 14 days expire
Once the countdown hits zero, the back door closes. You lose the ability to log in. Your email address and phone number are no longer linked to an active profile.
The social ripple effect is immediate and total. You vanish from your friends’ lists. If they try to tag you in a photo, your name does not appear in the dropdown. If they search for your username, the profile is gone. Comments you left on other people’s posts are stripped away. The digital ghost of your presence is scrubbed from the platform’s main interface.
This is why timing matters. You cannot pause the clock. You cannot shorten the wait. You simply have to stay away from the login screen for the full duration.
How to survive the waiting period
The hardest part is not the technical process. It is the temptation. You might see a notification on your phone. “New friend request.” “Someone liked a comment.” Your finger moves to the Facebook icon. Do not tap it.
If you are worried about losing access to your data before the 14 days are up, that is not the right time to act. You should have downloaded your archive before you initiated the deletion. Once the 14 days pass, that archive link is dead. The data is gone from the platform, and while Meta may keep some internal records for legal or security reasons for a short while, you do not have user-level access to retrieve it.
Why the process is so rigid
Facebook does not offer a “delete and undo” button in the traditional sense. The 14-day window is the only undo button. After that, the action is final. There is no customer support line you can call to reverse a completed deletion. No support ticket will bring your username back to life.
This rigidity applies to everyone. Whether you are a casual user who posted birthday pictures or someone with a massive following, the deletion timeline is the same. The platform treats the account as a unique entity that, once deleted, cannot be re-instantiated under the same identity.
Common mistakes that reset the clock
- Logging in to check if it’s gone. This is the most common error. If you see your profile, you are back at day one.
- Using the Facebook app while logged out. If the app automatically signs you in using cached data, it may count as a login attempt. Log out explicitly.
- Trying to message your own account. If you can still send a message to your username, the account is active.
The 14-day period is a buffer against impulse. It assumes that most people who want



Veri kurtarma ve sosyal çevre yönetimi
Hesabı kapatma düğmesine basmadan önce son bir kontrol. Fotoğraflarınız, mesaj geçmişiniz, o yıllar önce yazdığınız tatlı ama biraz naif gönderiler. Bunların hepsi bir tıklama uzaklıkta. Veri yedeği almak için acele etmeyin. Facebook’un “İndir” özelliği bazen saatler, bazen günler sürebilir. Dosya hazır olmadan silme işlemini başlatmak, dijital hafızanızı çöpe atmakla aynı şey.
Arkadaşlarınızı bilgilendirmek de ayrı bir mesele. Hesabınız gittiğinde, karşınızdaki kişiyle kurulan o görünmez bağ da kopuyor. Birkaç kişiye mesaj atın, e-posta adresinizi paylaşın. Sessizce kaybolmak, ilişkileri zorlaştırır.
Hesap silme işlemi geri alınamaz. Bu, bir kere tıklanan ve 14 gün içinde kesinleşen bir nokta.
14 gün bekleme süresi bir lüks değil, bir kısıtlama. Bu süre içinde giriş yaparsanız silme talebi iptal olur. Girmediniz mi? O zaman profiliniz, dostluklarınız, beğenileriniz ve yorumlarınız kalıcı olarak buharlaşır.
Maliyet ve teknik süreç
Bu süreç para gerektirmez. Hiçbir ücret yok. Sadece zaman ve biraz kararlılık.
Yol haritası basit ama kritik:
– Ayarlar & Gizlilik bölümüne gidin.
– Ayarlar ‘ı seçin.
– Hesap Sağlık Merkezi ‘ne ulaşın.
– Hesap Silme ve Deaktivasyon seçeneğine tıklayın.
– Hesabımı Sil ‘i işaretleyin ve Devam ile onaylayın.
Neden yapıyorsunuz? Gizlilik endişeleri mi? Bağımlılık mı? Hacked bir hesap mı? Nedeniniz ne olursa olsun, sonuç aynı: Sıfır.
Tamamen silindikten sonra geri dönüş yok. Geri almayı düşünmeyin bile. Bu, dijital dünyadaki “unutma hakkınızın” en radikal uygulaması.